Search Results for: cork floor
installing cork flooring
[warning: long post alert]
New flooring, finally! First though, to truly appreciate the “after”, let’s reflect on the chezerbey flooring of yore.

The living and dining room were graced with green carpet. Fortunately, there were decent oak floors underneath.

The kitchen had linoleum from an unidentifiable era. It may look retro cool, but any natural oils it once had were now long gone and that thing acted like a sponge, collecting dirt and crumbs and refusing to relinquish them without a lot of scrubbing.

And let’s not forget the astroturf in the back porch (which is now part of our kitchen). HORRID!
In the last six months, we have removed all traces of bad flooring and installed a new subfloor over the original fir floors (which were under all the other gunk). Even though the oak could have been refinished, we would have had a funky elevation change and in the interest of not having a giant threshold across our new cohesive “great room” space, we opted to cover it. The added layer also made the floor more stable, reducing any creaky spots.
Our first step was to prep the new subfloor. Even though we installed it to be perfectly level, cork is susceptible to imperfections telegraphing through, so this meant we needed to fill all of the plywood joints, indentions from screw heads, etc. That’s right, it was time for some self leveling compound.

First though, we needed to paint on a coat of latex primer for better adhesion to the subfloor. We used this product from Sakrete.


Since aesthetics weren’t important, we used a couple cheapo rollers for the job.

Poor Bailey, trapped in the bedroom by the two things he fears the most.

The primer dried quickly and left a shiny, slightly tacky surface.

I wish we had more pictures to share of the self leveling compound process, but honestly, it was a bit chaotic. The directions advised not to mix more than could be worked in 15 minutes(!). So we messed around with trying to mix a half bag which meant estimating the mix and then converting the appropriate amount of water from liters to gallons. (We also added some of the latex primer to the mix to give it some elasticity.) Let’s just say we didn’t get it perfect the first time around and the process generally went something like this:
“More water!”
“We need to mix this more!”
“Rags! Quick!”
“It’s already curing!”
“AHHHHHHH!”
Fortunately, Kyle soon got the hang of it and it turned out fine. He ended up troweling it on to make sure the mixture spread into every nook and cranny.

As soon as we were done, we found ourselves stuck outside and it had just started to rain. After rinsing off our tools, we made our way up through the basement and jumped from the top of the stairs to bedroom where we hung out until the floors were dry (or almost dry, as evidenced by all of our footprints, most of which lead to the fridge).

I really think Bailey could care less about the condition of the floors. This marked the end of Day 1 (last Saturday).

On to Day 2 (last Sunday) – there were still some areas that needed leveling out – nothing a little spackle couldn’t handle though.

After the spackle dried, Kyle sanded the areas smooth.

With a fresh coat of spackle dust all over the floors, we ran the vacuum through before laying any tiles. Mr. Dyson, we may be pushing the limits on what your products were designed to do.

Before we glued any tiles down, we needed to figure out where to start. This step may have been a bit over the top, but it ended up saving us a lot of headache. First we took a print-out of the plywood layout plan we had done earlier and then took as-built measurements of the space. We then adjusted our floor plan in AutoCad and superimposed a 12″x12″ grid over that. We then moved the grid around until we had found a layout that didn’t have seams in weird places or that would result in tiny strips of cork at the edges. We also wanted to, as much as possible, minimize cork joints that happened directly over plywood joints. Once we found the best compromise between the different factors, we chose a central spot in the living room and (using a 90 degree laser level) snapped a chalk line in both directions, with our starting place being the intersection of the two lines.

We bought 12″x12″ Capri cork tiles from Ecohaus. Typically they come unfinished or pre-finished with polyurethane. Since we wanted the ability to spot repair, we opted for a wax pre-finish. Unfortunately, after the tiles were delivered (months ago) we discovered that there was little to no finish on the tiles. More on that later.

The tiles are adhered with a special adhesive that most closely resembles Elmer’s glue. The process is similar to working with contact cement. You apply a thin coat of glue to the backside of each tile and to the floor and wait for both to dry before installing. We used a couple thin, low nap roller brushes and disposable plastic trays for the job.

We turned our kitchen island into a glue rolling station. Even though our particular tile color was fairly homogenous, we always worked from a minimum of 4 different boxes, mixing the tiles to ensure there would be enough variety.

We also found that rolling the glue on the diagonal kept the roller from accidentally slipping off the edge and getting glue on the sides of the tiles.

First tile!

After the tile is set, a good smack from a soft headed rubber mallet helps ensure that both surfaces are in contact with each other.

For the subsequent tiles, we found laying them at a slight angle and adjacent to a previously installed tile produced a good, tight fit.

This isn’t so bad! Only 500 more to go!

One of the challenges was finding space for the tiles to dry once they’d been coated with glue. With the tiles and glue we used, we could have applied the glue to the tiles up to 24 hours before installing. If we ever do this again, we may take that route since Kyle could lay them down faster than I could roll them.

The glue goes on opaque and turns clear, but still tacky, when dry enough to install.

We had to custom cut all of the edge tiles, but the process went smoothly with the use of a 12″ speed square, utility knife and small cutting board.


As the night wore on, our energy was dropping and our bodies ached but we had.to.finish.

Every hour or so we stopped to roll the areas that had already been set. We bought a small hand roller for the edges and hard to reach areas.

For the main areas, we rented a 100 lb. roller from Home Depot ($20/24 hrs – the sight of seeing me heave it into the back of the car – priceless). Anyhow, it worked like a champ and was well worth any public embarrassment.

The finished product looked more like suede and was pretty scuffed up from our footprints. We learned later that lower quality tiles can vary in size from tile to tile (!*@?) and we were so grateful that ours were all exactly the same size.


Phew, end of Day 2. Per our original plan, we would have been done at this point. But since there was a glitch with our order, the distributer and manufacturer worked it out so a third-party finisher would come out and do 3 coats of wax finish (using Osmo Wax), with no charge to us. We decided to schedule the 2-day finish job for when we would be out-of-town, since we wouldn’t be able to walk on the floors for those 2-3 days. So while we were at an out-of-state wedding this weekend, our floors were finished (hence the mad dash to get the install done last weekend)! And here is the finished product:


The floors have a matte, more organic looking finish, which we like a lot better than what you might get from a poly-based finish.

The appearance of the cork varies depending on the lighting and what angle you’re looking at. Looking across the room, it reads as a more homogenous, single color flooring, but if you look straight down, you really see the texture and variation of the cork granules.

And the finish is very smooth. For regular cleaning, we’ll just vacuum and use a microfiber cloth mop. The finish can handle a small amount of standing water, but there’s no need to wet mop this floor.

Finally, here’s a peak of the kitchen island against the flooring. The blue-gray high gloss cabinet finish is a chameleon itself, ranging from a light gray to a deep blue-gray depending on the lighting and how you look at it.
So there you have our exhaustive cork experience. Definitely leave a comment or shoot us an e-mail if you have any questions or have gone through the process yourself and have some additional tips to add. (You can also read more about our cork selection process here, here, here and here.) So far, we’re really pleased with how it turned out. In fact, we have (as of today) officially initiated our “no shoes” policy, which is a big milestone because before, it was more of a “no really, don’t take off your shoes” policy.
basement progress: electrical + subfloor
I’m just going to say it – June in Seattle is depressing. While the rest of the country is swimming, sunning and generally embracing summer, we’re still wearing sweaters and crossing our fingers that our tomato plants don’t keel over due to lack of sun. (The joke is that summer in Seattle doesn’t start until after the 4th of July and that’s usually about right.) But, if there’s a silver lining to the gray permacloud at least it makes it easier to work in the basement.
So with the crappy weather on our side, last weekend was a productive one and Kyle was able to finish the framing and electrical and get started on the subfloor.

For a small project like this, we just talked through where we would want outlets, switches and fixtures instead of producing an electrical plan. Our main goal was to come up with a layout that would provide the most flexibility whether the space is being used as a TV room or bedroom. Because of our short ceiling height, the biggest challenge to figure out was lighting. Obviously, you don’t want anything hanging down and recessed cans wouldn’t work with our exposed joists. So the plan is to install a couple of wall sconces (you can see the round electrical box for one in the photo above) that flank what will eventually be a built-in media/storage unit.

Kyle also framed out the little closet that contains the sewage ejector pump and access to our under-the-mudroom storage.

To make the space feel taller we’re leaving the joists exposed but the actual detail is a bit trickier. Unlike our living room ceiling, in the basement we have to contend with all the exposed nails coming through the subfloor from the old oak floors above (that are now covered with plywood and cork). Our solution was to furr down with 2×4’s and then attach sheetrock to that. Finally, we’ll sand up the joists a bit and then paint everything super white.

Here’s a shot looking back the other direction. Above the window, we’ll have a soffit with three recessed cans. There is likely to be a couch or bed against this wall so a little direct lighting made sense. The round electrical box in the foreground is for a smoke detector (required in every bedroom!) and the rectangular duct goes to the nursery above. When we had our new furnace and ductwork installed nearly 4 years ago, we had a feeling this space would eventually get finished out and made sure that any ductwork was as minimal as possible (same goes for the electrical, which is run only along the perimeter where it will be covered).

On the opposite wall Kyle roughed in power, data and cable. The TV/DVD/Xbox are in the living room for now, but the plan is to eventually move everything downstairs. I’m hesitant to use the words “media room” or “man cave” but we do see this room as a cozy space to watch movies.

Poor Bails, spending his weekend watching Kyle work. He might be the only dog that willingly will nap next to an air compressor.

Before the weekend was over, Kyle also got started on the Dri-Core subfloor (he’s actually installing the last pieces as I type). The 2’x2′ panels are comprised of a layer of OSB over a black dimpled plastic. Even though we installed a moisture barrier under the new topping slab, the plastic backing provides an airspace and keeps any water that might find its way in from coming up through the floor.

The panels have a tongue and groove slot on all four sides so they click together and form a floating floor system. They can be easily cut on a table saw and the whole process took a couple of hours max. At the edges, Kyle used wood shims to hold the panels away from the wall (to compensate for any future expansion and contraction).

For a snug fit, he whacked each panel in place using a few 2x’s and a mallet. (It’s hard to tell in the photos, but the seams are staggered for a more uniform installation.)

At the edges, he used a pry bar pushed against the sill plate to ensure a tight fit.


Naturally, Bailey was on hand to supervise. (I know, he is SUPER shaggy right now and is going to the groomer on Saturday!)


“A little to the left dad…hey, watch my paws!”
Kyle finished the subfloor tonight so the next step will be to frame the rest of the small hallway at the bottom of the stairs and pour a leveling slab. This weekend he’ll insulate and install the interior doors and then we’ll be ready for inspections and sheetrock. My mom has a feeling that zerbebe will come a week early and she tends to be right about these things so no dilly-dallying for us.
[Random side note – we were in the basement tonight hashing out a few details when Kyle nonchalantly tossed a pry bar on the floor. The sound made zerbebe jump, which is the first time that’s happened. Better get used to that kiddo. =) ]
cork + quartz
There are two major material decisions that we still haven’t finalized: our countertops and our flooring. I know, I know…we talked about cork here and here, and completely had our minds made up here, but as things evolve we are rethinking our flooring one more time. Bottom line – we still love cork. But the two major considerations in the type of cork have changed. #1. We now have a fancy, perfectly level subfloor throughout the whole space. This means we could do a glue down tile rather than a floating system. The advantage? The glue down tile is a through-body product, meaning it’s the same color all the way through (the plank, floating system is a thin veneer over a natural color cork). Which brings us to consideration #2. We have a large dog. While our earlier cork test was mostly a success, there was one event that became cause for concern. One evening, in a rare burst of golden retriever energy, Bailey leapt off the bed and skidded across the cork plank sample that we had set up at the bedroom door way. His excessively furry paws couldn’t stop the claw action. The result was a 6″ gauge that wasn’t too deep, but enough to expose the natural color cork below. We also knew that creating a bigger, more open space would only encourage such behavior.
So, even though we loved the color and pattern of our first choice, we’re back to cork tiles and have narrowed it down to two choices:

On the left we have a dark brown cork that is created from a steaming process (since cork does not naturally occur in this color). We love that it is different and it seems to go with our other color palette. We also love the “strip” pattern on the right, which is fabricated from scraps of other cork to achieve the variation in golden brown hues. The patterned option involves more labor to produce, so it’s a bit more expensive – but because we’ll be covering most of our floors, we want to make the right choice! Also, both options can be ordered with a wax finish (which we’ve found is the way to go since it allows spot repairs without having to refinish the whole floor).
Now on to the next challenge – back in January we talked about our top two counter choices. Since then, we have secretly fallen for the quartz product (below, left), which would be about $60-$70/SF (installed). This quartz comes in either a super snow white or a warmer off-white hue – neither of which are a perfect fit with the rest of our palette. Then, at our post-IKEA trip to Ecohaus last weekend we saw this. Eco quartz countertops are made with 75% recycled product and bound by corn resin! They’re also one of the few green residential products I’ve seen that is Cradle To Cradle certified. Best of all, their white color, “polar cap” (below, right) has flecks of blue-gray that would fit right in with our new cabinets (we would do a simple 2 cm square edge though, not the built-up version shown in the photo). The downside – it’s expensive. Very expensive…as in, $90/SF (installed) expensive. Our number one sustainable goal with the countertops has been to pick something that is both durable and a color/pattern that we could be happy with long term. Recycled content and eco-friendly resins would be icing on the cake, but we’ll have to weigh the added costs with our overall budget goals. Like the sink and faucet, we recognize the countertops will get a lot of daily action so making the right decision will be key.

So now it’s time to take it to the people. Darker or lighter cork? More affordable quartz or super sustainable, crazy expensive quartz? Or…are there still more options yet to consider? Now is the time!
cork: things to consider
We’ve talked about our cork test in regards to durability, but we thought we’d share some more information about cork and what to look for if you’re thinking about using it in your house.
1. If harvested correctly, cork is an inherently sustainable material. Not only is it rapidly renewable, but it also contains a natural waxy substance called suberin, which repels insects and keeps mold and microbes at bay. It also has a little give, which makes it a great choice for kitchens or other areas where you’re on your feet most of the time.

image of cork harvesting found here.
2. With cork, you have two options: glue down tiles or a floating system. For older houses (like ours), a floating system can be advantageous since the subfloor or existing flooring that you’re covering may not be perfectly smooth and level. A floating system can “ride the waves” so to speak, while any ridges or inconsistencies would telegraph through with a glue down approach. Also, installation of a floating system might be easier for a DIY homeowner (but buyer beware, look for quality construction to ensure all the pieces will actually fit together). For glue down tiles, it is usually recommended to adhere the tiles with contact cement, which makes getting it right the first time critical. Also, for new construction or larger applications, glue down tiles have their advantages in that after the unfinished cork is installed, it can be lightly sanded to reduce the appearance of seams and then finished in place. With the plank system, a tongue and groove panel construction means you simply lock the panels in place, without a need to nail or glue it to the subfloor. However, if you’re thinking of using plank flooring, look closely at the build-up. Typically, the flooring sandwich is composed of a thick piece of cork underlayment, a layer of hdf (high density fiberboard), and then the top layer of compressed cork (with or without a cork veneer over that). The glue used in the hdf or between the layers of materials can sometimes contain formaldehyde so check with the manufacturer to be sure. The appeal of natural cork certainly diminishes if you’ve got all sorts of crazy chems and VOC’s underneath!

image found here.
3. Which brings us to finishes – there seems to be two camps when it comes to finishing cork. Some products come prefinished with a coating of polyurethane while others are prefinished with a hardwax oil (and of course some come unfinished). The polyurethane is durable but sometimes has that plasticky look. We’ve also been told that it is hard to spot repair if you get a deep scratch. The hardwax oil (Osmo is a popular brand sold at Ecohaus) has a bit more elasticity to it and can be spot repaired. In fact, if you’re good about repairing scratches and blemishes as they happen, you may never have to refinish the entire floor.

4. Now for the fun part, colors. These days, there is a huge variety of cork options. Of course, there are the standard “corkboard” natural colors but there are also some interesting darker colors that have been achieved by steaming the cork (similar to carmelizing food). The great thing about going this route is you get a through body color (meaning what you see on the top is the same through the entire top layer). For most of the other options, the pattern or color is achieved by a thin veneer over the natural cork. The disadvantage to a veneered cork is that if it does get a deep scratch, you would see the natural cork color below. We were concerned about this at first (since we really like one of the veneered options) but after our multi-month “scratch test” we’re feeling pretty confident. Besides, we hope to someday have a “no shoes” policy that would prevent any stiletto punctures.
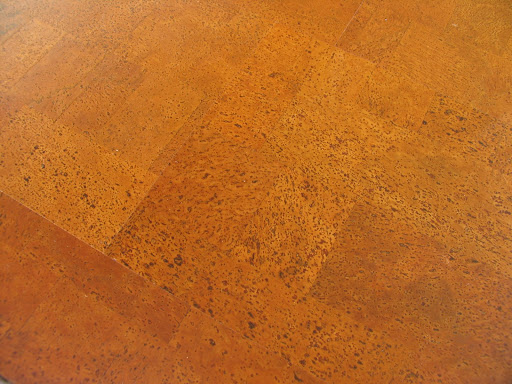
Image found here.
After considering all these factors, we are happy with our choice from Ecohaus – a 1’x3′ plank floating system that is formaldehyde free with a hardwax oil finish. We also love that cork is noticeably warmer than most other floor surfaces (at the molecular level, cork has tons of little air pockets which make it a better insulator)!
So there you have it, the low down on all things cork. Stay tuned for the next segment in which we hope to talk about how ridiculously easy it was to install!
the cork test: results
Three months ago we purchased a box of Vida cork flooring and installed a test piece in our bedroom. We soon moved the test area (3′ wide by 5′ long) to the kitchen to be sure it received not only paw traffic but foot traffic as well.
The results? We’re sold! It’s hard to tell from the photograph, but the cork has held up really well. Plus, it’s easy to clean and feels great underfoot.
The current plan is to install it in the future kitchen/dining area, but there has also been discussion of putting it over the oak floors in the future living/bedroom area as well. Because we will be opening up the floor plan quite a bit, we’re worried about transitions of materials between spaces. Would it look better if the flooring was the same throughout the “great room” area or should we try to keep a bit of the history of the house by keeping the oak floors (but maybe staining them a tad darker to better match the cork?). These are the type of quandaries that we still have to figure out and we may not make a decision until demo is complete and we can get a better sense of the new spaces.
But for now, we’re excited that the cork has passed the 3 month indurance test with flying colors and can’t wait to rid ourselves of the linoleum.*

[ * note – we love linoleum and think it’s a great green product, but ours was not maintained properly over the years and is now a dry and brittle dirt sponge.]

